
Do you remember MapQuest? I do, having used it back in the days of taping paper routes onto my dashboard. The company has made a number of upgrades to their mobile app without losing some of their quaint pixelated branding. There are a couple of tools you can’t find on other popular routing apps. Combine that with a noticeable uptick in interest and our continuous efforts to provide timely technology training, I have created a quick tutorial for you.
On a Desktop
Like I do for all mobile apps, I recommend that you start learning how to use it on a larger device, like a laptop or tablet, if possible. Most features seem to be available on both mobile and desktop.
One thing to see is that free MapQuest on a desktop or laptop is ad-heavy, with three windows appearing on the desktop screen. The map is topographical, with parks, streets and certain businesses displayed. You can scroll in and out. Along the top of the map is a button for initiating searches and then a series of popular search shortcuts.
At the top left corner is a search bar for getting directions, a log in button for creating an account, and a three-line menu icon. Under the menu icon lives an option called Route Planner, a free tool that allows you to import or type in up to 26 stops. It will create an optimized route for you — handy, eh? You can develop a list of saved, favorited locations which makes it easier to use MapQuest on your phone.
At the top right corner is a link to local radio stations. Old school inclusion but I like it.
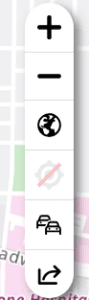
At the lower right is the working menu. The plus and minus signs control the zoom percentage. The third one down toggles satellite view and the forth one returns focus to your location, useful if you’ve been looking around. The fifth one allows you to toggle on traffic slowdowns and traffic incidents so you are warned about issues on the road ahead of you. And the final icon allows you to share this map with someone else.
About creating an account – it’s free. And you don’t have to have an account to just use the app, only to save anything. Under the menu on the top left, you will find a Route Planner for up to 26 stops (free,) travel planning advice (free,) a family-and-friends tracking service (paid,) and at the very bottom, a link to tell MapQuest to not sell your information.
On Your Smart Phone
Let’s focus on our smart phones, where everything is smaller. Your location is indicated by a small, haloed blue dot. Want to change it? Click on the blue icon on the lower right corner and you can choose a questie! Honoring their origins, your new icon can be a warrior, wizard, troll or unicorn.
Also under the icon is an option to go Ad-Free for a monthly subscription. So far, I’ve not seen any ads on my phone screen so perhaps that’s a way to go ad-free on a desktop? There is nothing in their Help section to explain.
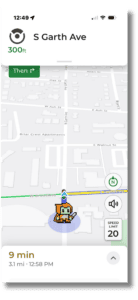
As you can see from the image, I have a sword and I’m on a quest — for tacos! Icons are available to toggle verbal instructions, to see the speed limit and when I will arrive. See turn-by-turn directions by touching the round icon at the top; starting at my Garth Ave location, I’ll turn into Broadway in about 300 feet. Or by clicking on the arrow on the lower section of the screen, you can end the route.
Another fun thing is to save locations from social media. It has to be enabled and it’s bound up in sharing locations with other people; skip that part of the set up, and then use this tool to capture places from Instagram and TikTok and others, using shareable links provided by the and business directory integrations. Find it under your personal icon on the lower banner, looking for the “save spots from social media” link.
Also under your personal icon (or blue dot) is settings. Route preferences are tucked in there, but of interest to me is the navigation audio. Yes, the voices. The sweet tones of people helping me find my way through town, so I don’t have to look at my car’s screen. Urm. Other than the default voice, MapQuest voices are, well, robotic. Ha! According to Claude AI, it’s older tech pieced together from pre-recorded phonemes and date back to the late 1990’s to the early 2000’s. The default voice is excellent, though, and I enjoy her style. She tells you to drive so many miles and turn right or left; not until you are close do you have to think about the street name.
Where Does the Data Come From?
One more interesting fact about MapQuest is that they get their data from TomTom. Remember TomTom devices? TomTom is a Dutch-owned company that has also continued progressing and has a mobile app. Historically, TomTom’s data came from companies like NAVTEQ, which TomTom acquired years ago, and MapQuest has also drawn on government sources for road data. MapQuest’s location data comes from partnerships with dozens of specialized data providers who gather geocoding info for restaurants, gas stations, hotels, and more. Additionally, MapQuest has an open source version powered entirely by OpenStreetMap data, created by people like you and me from all over the world.
So there you have it. A short but enthusiastic introduction to MapQuest. I hope you enjoy the ambiance, if you do download it. And last fun fact, for real this time: you can still print out your directions, if you wish.